Lighting Rigs: Studio, Sunset, Neon & Moonlight Presets
Ever noticed why some digital images seem flat, while others leap out with cinematic depth? The answer often lies in how shadows and highlights are used to set a mood. With the right professional setups, you can turn simple images into stunning works that grab your attention right away.
To achieve these effects, you need to control your environment carefully. Using ai porn lighting rigs lets you create scenes like a soft sunset or a bright neon glow. Grasping these basics is key to improving your digital projects in a competitive world.
Key Takeaways
- Learn how to manipulate light to add professional depth to your digital work.
- Discover how specific presets can simulate natural and artificial environments.
- Master the balance between shadows and highlights for cinematic results.
- Understand the importance of precise parameter control in your workflow.
- Elevate your creative output to stand out in a crowded digital market.
Understanding the Fundamentals of AI Porn Lighting Rigs
To make great ai porn lighting rigs, you need to know how software sees light. You’re like a virtual director, shaping every scene. Learning these skills lets you set the mood and look of each frame.
The Role of Light in AI Image Generation
Light is key for depth and texture in your scenes. Updates like OpenUSD 25.05 have made UsdLux better. Now, your ai porn lighting rigs work the same in all software.
Key Parameters for Lighting Control
Getting pro results means knowing a few key settings. These settings affect how light looks on surfaces and skin. By adjusting these, you control your project’s look.
Adjusting Intensity and Contrast
Intensity controls how bright your lights are. Contrast shows the difference between light and dark. Playing with these can make your scenes look sharp or soft.
Color Temperature and Hue Shifts
Color temperature changes the mood, from cool to warm. Hue shifts let you color your lights for style. Using these tools well is crucial for top-notch ai porn lighting rigs.
| Parameter | Function | Visual Impact |
|---|---|---|
| Intensity | Brightness Level | Defines scene exposure |
| Contrast | Shadow Depth | Adds visual drama |
| Temperature | Kelvin Scale | Sets the mood (Warm/Cool) |
| Hue | Color Tint | Provides artistic style |
Setting Up Your Professional Studio Lighting Rig
Getting cinematic depth in your work starts with the basics of professional lighting. Building ai porn lighting rigs creates a space like high-end photography studios. It lets you play with shadows and highlights to make your models look real.
Configuring Three-Point Lighting
The three-point system is key for film and digital art. It uses three lights to light up your subject right and create contrast. This setup helps avoid dull, flat images.
To get this right, know what each light does in your scene:
- Key Light: This light shapes your subject’s main features.
- Fill Light: It softens shadows made by the key light.
- Backlight: It adds a light rim around your subject, separating them from the background.
Achieving Softbox Diffusion Effects
Direct light can look fake or harsh on skin. Softbox diffusion spreads light for a soft, natural glow. This is crucial for ai porn lighting rigs to look professional.
Softboxes make light look like natural window light or studio modifiers. They smooth out shadows, blending skin tones well. This makes your images look much better.
Positioning Key, Fill, and Backlights
Getting your ai porn lighting rigs right means knowing where to put each light. Start with your key light at a 45-degree angle to your subject. This highlights their features and shape.
Then, put your fill light on the other side, but softer. This keeps shadows but doesn’t overwhelm. Finally, place your backlight high and behind to add a dramatic rim light for depth.
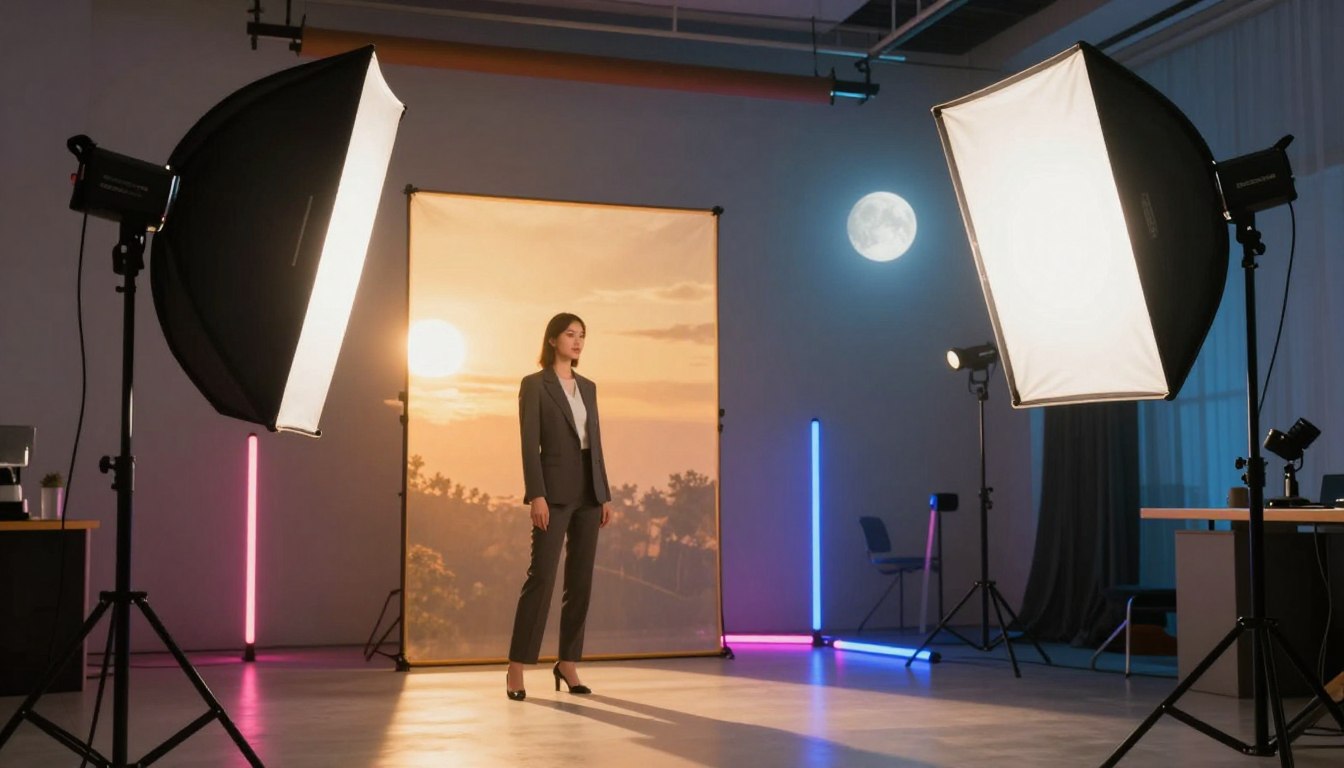
Mastering Sunset Presets for Warmth and Depth
Creating the warm glow of the golden hour is key for lighting rigs ai pros. Natural light changes constantly, so planning is crucial to catch that perfect moment. Tools like Helios Pro help you see the sun’s path, making sure your scene matches the time of day you want.
Simulating Golden Hour Characteristics
The golden hour has a low sun angle, giving a soft, diffused light. To get this in your lighting rigs ai, place your main light just above the horizon. This mimics how light scatters in the air, removing cool blue tones.
This method also makes your subjects’ textures look better. Keeping the light intensity moderate avoids harsh highlights. It keeps the whole scene rich and golden.
Balancing Warm Tones with Long Shadows
For a realistic sunset, you need to balance warm colors with long shadows. Use a deep orange or amber for your main light to ground the scene. Long shadows add contrast, making the warm light stand out.
If shadows are too dark, add a cool blue fill light. This contrast between warm highlights and cool shadows adds depth for a pro look.
Adjusting HDR Presets for Sunset Realism
HDR presets are the base for your lighting. With lighting rigs ai, make sure your HDR map matches your manual lights. Adjusting exposure and gamma in your preset helps blend the background and subject seamlessly.
| Parameter | Setting | Visual Impact |
|---|---|---|
| Color Temperature | 3000K – 4500K | Increases warmth |
| Shadow Length | Extended | Adds dramatic depth |
| HDR Exposure | -0.5 to -1.5 | Prevents overexposure |
| Light Intensity | Low to Medium | Softens skin tones |
Creating Vibrant Neon Lighting Rigs
Creating high-energy environments starts with the right approach to lighting rigs ai. Neon aesthetics bring a futuristic, electric pulse to your digital scenes. This is something standard setups can’t match. By focusing on intense saturation and precise color placement, you can transform ordinary renders into visually striking masterpieces.
Utilizing High-Contrast Color Palettes
To achieve a professional neon look, you must master the use of complementary color schemes. Pairing deep purples with electric cyans or hot pinks with lime greens creates an immediate sense of depth. These high-contrast combinations force the viewer’s eye to focus on the subject while the background recedes into a moody, atmospheric haze.
When designing your lighting rigs ai, consider how these colors interact with the surrounding geometry. Using a limited palette of two or three dominant colors prevents the scene from becoming cluttered. This restraint ensures that your neon elements remain the focal point of the composition.
Implementing Glow and Bloom Effects
Modern digital lighting often draws inspiration from real-world hardware like Astera Titan tubes. These wireless LED batons feature 16 individual pixels that allow for complex, programmable light patterns. You can simulate this dynamic energy in your software by applying bloom filters to your primary light sources.
Bloom effects simulate the way light scatters in a camera lens, adding a soft, ethereal halo around your neon fixtures. By adjusting the threshold and intensity of these effects, you create a realistic sense of luminosity. This technique is essential for making your lighting rigs ai feel grounded in a physical space.
Managing Light Bleed and Reflections
While glow is desirable, uncontrolled light bleed can quickly ruin the clarity of your render. You must carefully manage the falloff of your neon sources to prevent them from washing out the textures of your character or environment. Using light blockers or adjusting the bounce settings helps keep your scene clean and focused.
Reflections are equally important when working with neon. High-gloss surfaces will pick up the vibrant colors of your lights, adding a layer of sophisticated realism to the final image. The following table outlines the key parameters for balancing these effects effectively.
| Parameter | Low Intensity | High Intensity |
|---|---|---|
| Bloom Threshold | Subtle Glow | Dreamy Haze |
| Light Bleed | Sharp Edges | Soft Diffusion |
| Reflection Gain | Matte Finish | Mirror Polish |
Crafting Ethereal Moonlight Presets
You can turn any digital space into a magical night scene with moonlight. Even though moonlight is really just one color, movies use blue to mean night. When you work on your lighting rigs ai, you’re using light to set a mood, not just to look real.
Cooling Down the Color Temperature
To get that dreamy look, you need to cool down the colors. Most pros use Kelvin values from 6,000K to 9,000K for those cool blue tones. By tweaking these settings in your lighting rigs ai, you make your subject stand out against the background.
Simulating Soft Nighttime Shadows
Nighttime lighting is soft and gentle, not harsh. So, your shadows should be soft too. You can make them softer by making your light source bigger or blurring shadow maps. Soft transitions between light and dark make your scene feel natural and moonlit.
Enhancing Depth with Low-Key Lighting
Low-key lighting adds mystery to your scenes. By keeping most of the scene dark and using a cool-toned rim light, you draw the viewer’s eye to the subject’s shadow. This trick is key for lighting rigs ai to avoid a flat look.
It’s all about mixing the myth of blue light with today’s tech. Keep your highlights soft to keep the scene feeling real and nighttime-like.
Advanced Techniques for Customizing HDR Presets
Move beyond default settings to achieve cinematic realism. Refining your hdr presets lets you control light in your digital world. This precision turns flat images into immersive, high-fidelity scenes.

Integrating External Lighting Data
Import external lighting data like high-dynamic-range environment maps. These files add authentic light information from real-world locations. They make your hdr presets react naturally to your scene’s geometry.
Fine-Tuning Global Illumination
Global illumination settings control light bouncing off surfaces. Adjust the light path depth to add depth without losing details. Careful calibration prevents muddy shadows, keeping your images crisp.
Layering Multiple Lighting Sources
Complex scenes need multiple light sources for the right look. Use ghost factors to remove unwanted reflections or refractions. This lets you focus on specific parts of your image.
| Control Method | Primary Benefit | Complexity Level |
|---|---|---|
| External HDR Maps | Real-world realism | Moderate |
| Global Illumination | Bounced light accuracy | High |
| Ghost Factors | Reflection isolation | Advanced |
Mastering these hdr presets ensures each light source has a purpose. Experimenting with these layers will enhance your creative projects.
Optimizing Lighting Rigs for Character Consistency
To make your characters look the same in every frame, your lighting setup must be precise. You need to go beyond basic settings and use advanced tools like light linking. This way, your hdr presets work well in any environment.
Maintaining Skin Tone Accuracy
Keeping skin tones balanced is hard when you change the background. To keep your character natural, focus your key light on the skin. Light linking stops background lights from affecting your character’s color.
By setting up a special light path for the face and body, your character looks consistent. This method keeps your character’s skin looking vibrant and real, even in complex scenes.
Adjusting Lighting Based on Character Proximity
The distance to a light source changes how your character looks. As they get closer, the light’s intensity and how it fades change. You must adjust the light’s strength to keep the look consistent.
Handling Complex Textures and Materials
Materials like metallic, leather, or translucent fabrics react differently to light. When working with these, your hdr presets must avoid unwanted highlights or shadows. Strategic light linking helps by letting you control light for each object.
By separating clothing and skin lighting, you control the final image better. This detailed approach prevents textures from looking flat or too shiny. It’s what makes a professional render stand out.
Troubleshooting Common Lighting Artifacts
Even the most advanced lighting setups can sometimes have unwanted visual issues. These problems can happen with both complex hdr presets and simple studio setups. Knowing how to spot and fix these errors is crucial for any digital artist.
Fixing Overexposed Highlights
Overexposed highlights happen when light is too strong for your virtual camera. If your scene has blown-out whites, try reducing the light intensity. Also, check your exposure settings to avoid over-brightening.
Adjusting the tone mapping settings in your software can also help. This compresses highlights, keeping bright areas detailed without losing the scene’s mood. Finding this balance is key to a professional look.
Correcting Unnatural Shadow Patterns
Unnatural shadows show as jagged edges or harsh transitions. To fix this, improve your light falloff quality. Increasing shadow samples per pixel in your settings is the best way to smooth these edges.
More samples mean better visuals but slower rendering. You’ll need to find the right balance between speed and quality. Smooth light falloff is essential for a natural, cinematic look.
Resolving Color Banding Issues
Color banding shows as visible steps in gradients, often due to low bit depth. To fix it, use a higher bit depth, like 16-bit or 32-bit, before exporting. This ensures smooth color transitions in your lighting.
If problems persist, try a subtle dithering effect on your final image. This breaks up color bands, making them look more natural. Proper hdr presets and export settings can eliminate these issues, giving you clean, high-quality images.
Workflow Integration for Efficient Lighting Design
Streamlining your lighting design process lets you focus more on creativity. You spend less time on technical adjustments. A reliable system means less time on repetitive tasks and a professional look in all your projects.
Saving and Organizing Custom Presets
Creating a library of your favorite lighting setups is key. Organize your files by mood, intensity, and light source. This makes finding them quick and easy.
Working with old files? You can update them easily. Use the UpgradeUsdLuxLights command to keep them current. This way, your older assets stay up to date with your current work.

Batch Processing with Consistent Lighting
Consistency is crucial for a professional portfolio. Using standardized hdr presets on multiple scenes keeps your look consistent. This makes your collection visually cohesive.
Batch processing saves you a lot of time. It lets you test different hdr presets without adjusting each light source. This speeds up your workflow.
Iterating on Lighting Rigs for Better Results
Don’t settle for the first result. Keep tweaking your light intensity and color temperature. See how these changes affect the final image.
Keep refining your work. Reviewing your past projects and adjusting your hdr presets helps you improve. Over time, you’ll get faster and more efficient.
Conclusion
Mastering lighting rigs is a mix of technical skill and creative thinking. You can turn simple images into deep experiences with the right lighting. This guide has shown you how to use studio, sunset, neon, and moonlight presets.
How you use light affects the mood and quality of your work. Trying out advanced hdr presets lets you explore new levels of realism and art. These settings add depth, making your subjects pop in any digital space.
Improving your lighting takes practice and patience. Each project is different, so you need to adapt your approach. Using custom hdr presets keeps your style consistent and powerful everywhere.
Show off your work to get feedback and ideas. Your adventure with AI image generation is just starting. Keep trying new things to find what fits your style best.
FAQ
How do lighting rigs ai improve the overall quality of my digital renders?
Using professional lighting rigs ai can turn simple renders into stunning visuals. These tools help you grasp the basics of light. This way, your work can stand out by offering top-notch results every time.
What specific software specifications influence light emission in these rigs?
Software specs like UsdLux 25.05 play a big role in your digital work. Learning these details lets you control light intensity, contrast, and color. This lets you set the mood of your AI scenes exactly as you want.
What is the benefit of using a three-point lighting system for character models?
The three-point lighting system adds depth and dimension to your models. It includes key, fill, and backlight lights. When you add softbox diffusion, your character lighting looks flattering and professional.
How can I replicate the “Golden Hour” effect using hdr presets?
To capture the beauty of a sunset, use hdr presets with warm colors and long shadows. Adjusting these presets helps keep your scenes realistic and deep, just like the golden hour.
What techniques are essential for creating vibrant neon environments?
To make neon scenes pop, focus on color and bloom effects. Use modern LED-inspired techniques for high-contrast colors. Also, manage light bleed to keep your scene clean and focused.
How do I achieve a realistic moonlight effect without making the scene look flat?
For convincing moonlight, use cooler colors instead of pure white. Low-key lighting and soft shadows add mystery and depth. This makes your scene look sophisticated and cinematic.
Can I customize hdr presets by integrating my own data?
Yes, advanced users can enhance their projects by adding their own lighting data. Fine-tuning global illumination settings and layering light sources through advanced presets gives you full control over your scene’s lighting.
How do I ensure character consistency when moving between different lighting environments?
To keep your character’s skin tone consistent, use light linking. This way, you can adjust lighting rigs ai for different scenes while keeping your characters looking perfect.
What is the best way to troubleshoot overexposure and color banding in a render?
For color banding or overexposed highlights, tweak your rendering settings and light falloff. Fine-tuning these will fix unnatural shadows and ensure a smooth, artifact-free result.
How can I make my lighting design workflow more efficient for large projects?
To boost productivity, save and organize your custom lighting rigs as presets. This makes batch processing easier. It helps maintain a consistent look across big projects while improving design quality and speed.