Color Grading with Neural LUTs: Warm, Cool & Noir Palettes
Ever wondered why your raw footage doesn’t have that polished, cinematic depth like studio productions? Many creators find it hard to make their footage look professional. The key is often in advanced software that brings every frame to life.
Just like Instagram, professional visual workflows keep their best secrets hidden. But now, modern tech makes it easy to unlock these secrets. With neural LUTs, you can instantly change your project’s mood with advanced styles.
Whether you want a warm glow, a cool aesthetic, or a dramatic noir look, these tools have you covered. Learning ai porn color grading techniques will make your work stand out. Now, you’re ready to take your storytelling to the next level with smart software.
Key Takeaways
- Neural LUTs provide a shortcut to achieving professional cinematic aesthetics.
- Advanced software tools help bridge the gap between raw footage and studio-quality results.
- Understanding color palettes allows you to dictate the emotional tone of your video.
- Modern technology makes complex visual adjustments accessible to all creators.
- Consistent application of these techniques ensures a cohesive look across your entire project.
Understanding the Role of AI Porn Color Grading
AI porn color grading is changing how creators tell stories and work on post-production. It uses advanced neural networks to automate color tasks that took hours to do by hand. This tech checks each frame in real-time to keep your footage looking professional and cinematic in every scene.
These tools are great at understanding lighting and skin tones. You don’t have to spend all day adjusting colors. Instead, you can focus on the story and how scenes are set up.
Keeping a consistent look is key to keeping your audience loyal. Even on platforms like Instagram, viewers expect a smooth and high-quality visual experience in all your content. Using AI for color grading helps keep your brand looking good, no matter the lighting.
These neural tools make your production work faster and better. They help you work quicker without losing the visual quality that viewers want. Using this tech is a smart choice for anyone wanting to improve their production value quickly.
Preparing Your Footage for Neural LUT Application
Getting great results with neural LUTs starts before you apply the filter. You need to make sure your footage is ready. This means avoiding clipping or color shifts. This foundational step is key for top-notch color grading ai porn.
Setting Up Your Color Space
First, set your project color space to match your output. This ensures your AI tools work right. Consistency here stops the software from messing up your data.
If your color space doesn’t match, your final look might be off. Always check your timeline settings against your source media. This step helps your neural LUTs work best without digital issues.
Correcting Exposure and White Balance
Proper exposure and white balance are the base of professional grading. Your footage needs a clean start, like Instagram’s login. Correcting these values early helps the AI get skin tones and shadows right.
Use scopes to check your blacks and highlights. Once balanced, you can apply your look with confidence. This careful approach makes your final product look polished and cinematic.
Selecting the Right Neural LUT Pack for Your Project
Choosing the right color grading ai porn assets is key to a polished look. The right tools help you achieve a consistent visual style. This aligns with your creative vision. Spending time on selection helps avoid common post-production delays.
Evaluating Compatibility with Your Editing Software
Before picking a lut pack, check if it works with your editing software. Most software like DaVinci Resolve and Adobe Premiere Pro support standard formats. But, performance can differ a lot. Always test a sample file to see if it runs smoothly.
When checking software integration, consider these points:
- File Format Support: Make sure the files work with your software version.
- Performance Impact: See if the LUTs slow down playback.
- Color Space Mapping: Check if the pack matches your camera’s color space to avoid clipping.
Assessing the Aesthetic Range of LUT Packs
The best lut pack offers flexibility in different lighting. It should work well with various skin tones and settings. Good color grading ai porn solutions have a wide range of looks, from small tweaks to big changes.
Look for packs with different exposure levels. A good set lets you keep a consistent style while adjusting to each scene’s needs. This smart approach improves your workflow and keeps your project moving.
Mastering Warm Palettes for Intimate Scenes
Transforming a scene’s mood is easy with a lut pack. Warm colors create a cozy and inviting feel. This makes viewers feel closer to the story.
Adjusting Skin Tones and Mid-tones
Getting a natural look means paying attention to skin tones. Use a lut pack to keep mid-tones balanced. This avoids an unnatural look.
Check the vectorscope to see if skin tones are right. If they’re too red or yellow, tweak the colors. This keeps your subjects looking great on screen.
Enhancing Golden Hour Lighting Effects
You can create golden hour light in any setting with a good lut pack. It brings soft shadows and warm highlights. This makes scenes feel more like a movie.
To get this look, brighten the highlights and cool the shadows a bit. This contrast makes the warm light stand out. Start with a lut pack and then fine-tune the colors.
| Adjustment Type | Primary Goal | Recommended Action |
|---|---|---|
| Skin Tones | Natural Appearance | Align with vectorscope line |
| Mid-tones | Emotional Depth | Increase warmth via LUT pack |
| Highlights | Golden Hour Glow | Boost luminance and amber hue |
| Shadows | Cinematic Contrast | Slightly desaturate for balance |
Implementing Cool Palettes for Cinematic Depth
Using blue tones can add mystery or tension to your scenes. Cool palettes are key in modern video making for a cinematic sophistication feel. They turn regular footage into a story that looks polished and intentional.
Managing Shadows and Blue Tints
Working with cool tones can make images look muddy or flat. It’s crucial to keep shadows sharp to avoid losing detail in dark areas. Proper shadow management ensures your footage looks clear on any screen.
Here are key steps for using blue tints without losing image quality:
- Adjust your lift and gamma wheels for subtle blue hues without losing blacks.
- Apply a high-quality lut pack to cool the scene while keeping skin tones natural.
- Check your scopes to avoid blue channel clipping and digital noise.
Creating a High-Contrast Moody Atmosphere
To get a moody look, balance cool colors with high contrast. A good lut pack can quickly adjust your color balance. This makes your subject stand out against the background, adding depth.
“Color grading is not just about changing colors; it is about guiding the viewer’s eye and setting the emotional tone of the story.”
Consistency is key with high-contrast grades. Bright highlights and deep shadows create tension. Always check your work on a calibrated monitor to ensure it looks right on all screens.
Crafting Noir Palettes for Dramatic Visuals
You can turn regular footage into a cinematic gem by mastering noir visuals. This style uses precise manipulation of light and shadow. It creates a timeless feel for your viewers.
By playing with darkness and light, you set a mood that’s both professional and atmospheric. This mood grabs your audience’s attention.

Optimizing Black Levels and Contrast Ratios
To get a true noir look, your blacks must be deep and rich. But they should still hold detail. Adjust your shadows to just avoid clipping, keeping your image sharp.
A high-quality lut pack helps map these values across your project. This ensures a consistent look.
It’s also key to balance your highlights. You want them to stand out against the dark background. This creates a stark contrast that’s central to noir.
If your highlights are too dull, the scene’s drama will suffer. You need them to pop.
Utilizing Monochrome and Desaturation Techniques
Monochrome grading highlights texture and form, not just color. By desaturating your footage, you focus the viewer’s attention. A lut pack makes these classic film looks easy to achieve.
When using these effects, watch the mid-tones to avoid muddiness. Aim for a smooth transition from blacks to whites. This balance is key to a professional, cinematic output that engages your audience.
| Setting | Noir Adjustment | Visual Impact |
|---|---|---|
| Shadows | Crush slightly | Deep, moody blacks |
| Highlights | Increase gain | Sharp, clean edges |
| Saturation | Reduce to 0% | Classic monochrome |
| LUT Pack | Apply Noir Filter | Consistent film look |
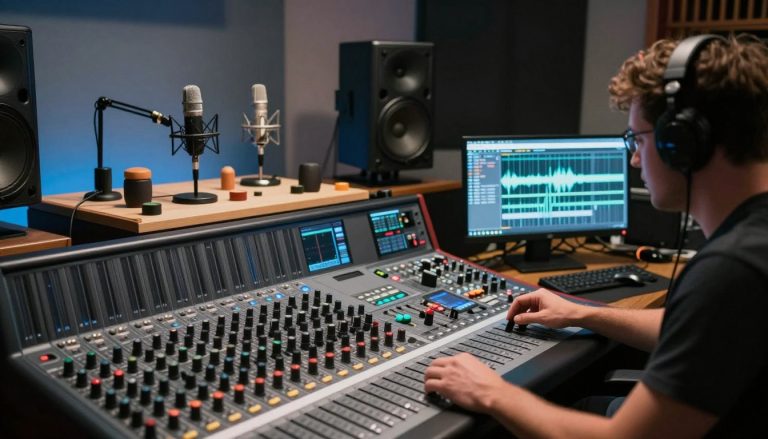
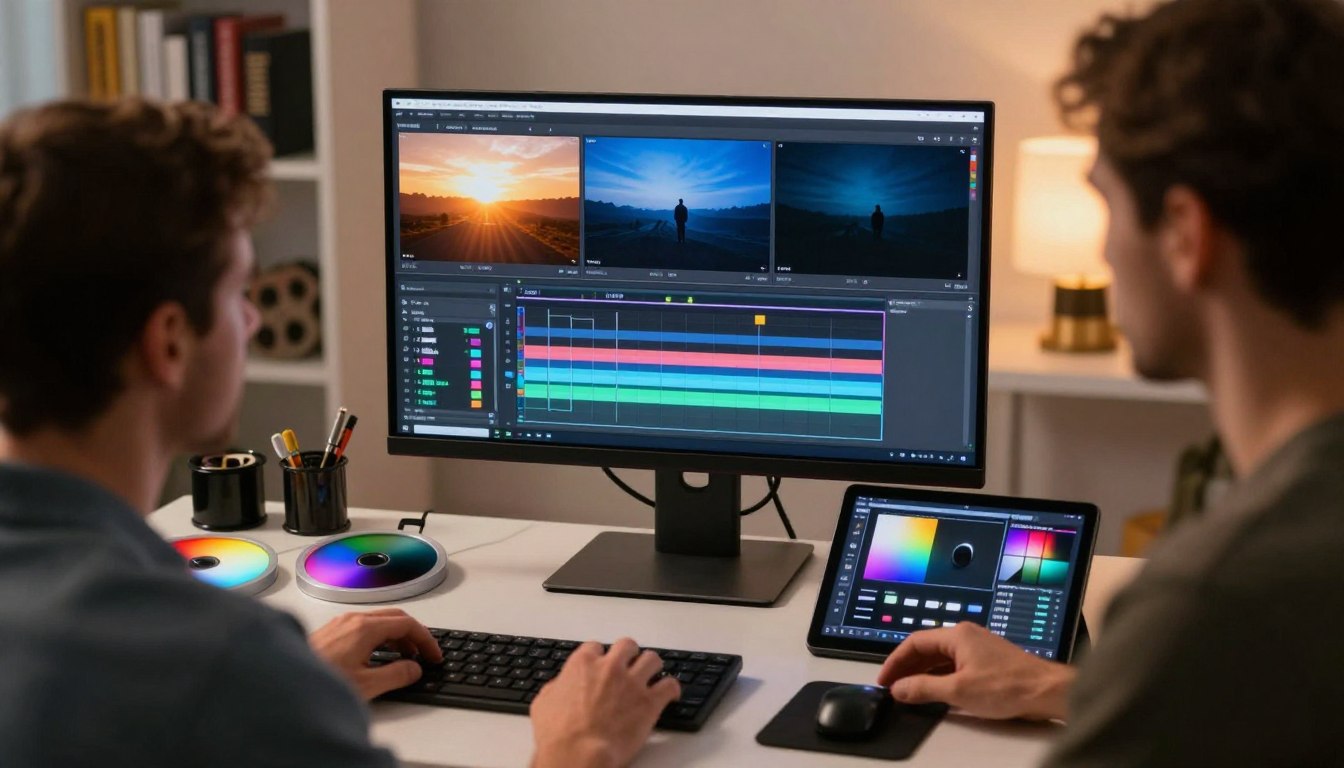
Step-by-Step Workflow for Applying Neural LUTs
Following a clear guide for applying neural LUTs can make your creative process smoother. A consistent workflow helps keep your ai porn color grading professional and efficient in every project.
Importing LUTs into DaVinci Resolve or Adobe Premiere
To start, you need to load your files into your editing software. In DaVinci Resolve, go to Project Settings, then the Color Management tab. Click Open LUT Folder to add your files.
Adobe Premiere users should use the Lumetri Color panel. Open the Creative tab, then the Look dropdown menu. Choose Browse to add your custom files. Proper organization of these files will save you time later.
Layering Effects for Custom Color Grading
After importing your LUTs, you can start creating a unique look by layering effects. This method adds depth and complexity to your images. Here’s a simple workflow:
- Apply a base correction node to fix exposure.
- Add a secondary node for your chosen neural LUT.
- Use a final node for subtle grain or sharpening effects.
Adjusting Opacity and Intensity
Most LUTs need fine-tuning to fit your footage’s lighting. Lowering the opacity blends the original colors with the neural enhancements. This prevents the image from looking fake.
Masking Specific Areas for Targeted Grading
At times, you might only want to grade a part of the frame. Masks help you target specific areas, like skin tones or backgrounds. This ensures your ai porn color grading is precise. Soft-edged masks guide the viewer’s eye, enhancing the cinematic feel of your work.
Troubleshooting Common Color Grading Issues
Even the most advanced color grading workflows can hit technical hurdles. These issues can affect your final output. When you push your color data too far, you might see unexpected visual artifacts. It’s crucial to keep your color grading ai porn workflow at high visual standards for a professional look.
Fixing Banding and Artifacting
Banding shows up as visible steps in gradients, especially in dark areas. It often happens when your footage lacks enough bit depth or has heavy compression. To fix it, add a subtle layer of film grain or noise to soften the lines.
For digital artifacts, first check your export settings. Make sure you’re working in a high-bit-depth environment, like 10-bit or higher. A de-banding filter can also help smooth out transitions without losing important details.
Correcting Over-Saturated Skin Tones
Over-saturated skin tones can make subjects look unnatural or “plastic” under bright lights. Always use your vectorscope to check skin tone lines, not just your eyes. If the signal goes too far to the edges of the scope, you’re over-saturating.
To fix this, use a secondary color correction tool to target skin tones. Lower the saturation or tweak the hue a bit to bring back a natural and healthy look. This fine-tuning is key to high-quality color grading ai porn.
| Issue | Primary Cause | Quick Fix |
|---|---|---|
| Banding | Low bit depth | Add subtle grain |
| Artifacting | High compression | Increase bitrate |
| Skin Saturation | Aggressive LUTs | Use secondary masks |
| Color Clipping | Exposure limits | Adjust gain/lift |
Advanced Techniques for AI-Enhanced Color Correction
Color grading is a mix of AI and manual control. Neural LUTs are a strong start, but the best results come from combining them with manual tweaks. This way, you can make your ai porn color grading truly unique.

Using AI Masks for Selective Color Adjustments
AI masks change how we edit. They let you adjust specific parts of a frame, like skin tones or backgrounds. This precision keeps your main subject looking great while the rest gets a special look.
With these masks, you can change a background wall’s color or light up an object without messing up the whole scene. This control is key for keeping your work looking top-notch. It stops color spill, where a strong LUT might lose important details.
Refining Neural LUTs with Secondary Color Wheels
After applying a neural LUT, use secondary color wheels for fine-tuning. These wheels let you tweak shadows, mid-tones, and highlights separately. This is where you turn a standard preset into a custom, high-end visual style that really pops.
These wheels help you adjust shadows or add a touch to highlights for a cinematic look. Adding these manual touches to your ai porn color grading makes every frame look deliberate and polished. This mix of AI and manual work gives you the flexibility needed for professional video.
Optimizing Your Workflow for Faster Production
Mastering your workflow is key to keeping quality high and speed up. Saving seconds in post-production adds up to big gains. Smart organizational strategies help you keep a consistent aesthetic in all your videos. This way, you avoid getting bogged down by the tech of color grading ai porn.
Creating Custom Presets for Consistent Looks
Building a library of custom presets saves a lot of time. Once you nail a look for a scene, save it as a template. This lets you apply your style to new footage quickly, keeping your brand look uniform across projects.
Organize these presets by lighting or mood to find them easily. Consistency is key for a loyal audience. Presets help you maintain that, freeing up your creative energy for more complex stories.
Batch Processing Multiple Clips
Batch processing is a big help for editors under tight deadlines. Instead of grading each clip separately, apply your color grade to many at once. This is great for keeping a look consistent in long videos.
Using batch tools well makes your color grading ai porn workflow smoother. You can focus on tweaking shots instead of doing the same thing over and over. Efficiency in your technical process means you can produce more. With these habits, your post-production time will drop, and your quality will stay high.
Conclusion
Learning about neural LUTs and AI tools is a big step for video creators. You now have the skills to make your videos look much better.
Using these advanced tools lets you control the mood of your videos. You can change light and color to make your work feel more emotional in DaVinci Resolve or Adobe Premiere.
Being consistent is key for a great colorist today. Making sure every frame looks professional is crucial.
Try out these methods to find your own style. Your journey as a creator is ongoing, and you can always improve your skills.
Show your work to others to get feedback on your color grading. Growing as an editor means always trying new things and using these AI tools.
FAQ
What makes neural LUTs different from traditional color presets used in video production?
Neural LUTs use AI to analyze each frame of your footage. This means they can apply color science in a more advanced way. They adjust to the lighting and texture of your scene, unlike standard filters.
Why is specialized color grading ai porn technology becoming essential for high-end adult film production?
High-contrast visuals in adult films need consistent skin tones. AI tools for color grading help automate these corrections. This ensures a high-quality look, even in different lighting conditions.
Do I need to prepare my footage before applying a neural LUT pack?
Yes, you need to prepare your footage first. Set the right color space and adjust exposure and white balance. This “unlocking” phase is crucial for the LUTs to work well without issues.
Which editing software is best suited for implementing AI-enhanced color grading?
DaVinci Resolve and Adobe Premiere Pro are top choices. They support external LUT packs and secondary color wheels. This gives you control over the final look of your film.
How can I achieve a “Golden Hour” aesthetic in my intimate scenes using neural LUTs?
To get a warm look, pick a LUT that highlights amber and gold tones. Adjust mid-tones to keep skin natural. This creates a cozy, professional atmosphere.
What is the best way to handle shadows when using cool, moody palettes?
When using cool palettes, manage shadows and blue tints carefully. Use tools like parade scope to keep black levels clean. This adds depth to your scene without making it look muddy.
How do I fix banding or digital artifacting after applying a heavy color grade?
Banding can happen when footage lacks depth or when LUTs are overused. Use AI to smooth out gradients or add digital grain. Normalizing your footage before applying LUTs helps prevent this.
Can I use neural LUTs for batch processing multiple clips at once?
Yes, you can. AI tools let you create custom presets. Use these to apply a consistent look to all your clips in Adobe Premiere. This speeds up your workflow and keeps your visuals consistent.
Is it possible to customize a neural LUT once it has been applied?
Yes, treat a LUT as a starting point. Use secondary color wheels and AI masks to fine-tune specific areas. This lets you unlock the full potential of your footage.
How do Noir palettes differ from standard monochrome filters?
Noir palettes focus on contrast and black levels, not just removing color. AI-driven Noir LUTs enhance texture and detail in monochrome scenes. This gives a sophisticated look that rivals studio outputs.